Reclaiming Color from Washed-out Skies
Earlier this year, I posted an article on manipulating contrast ranges when there is low overall contrast. This week, I illustrate a similar technique to handle a situation where high overall contrast leads to low local contrast.
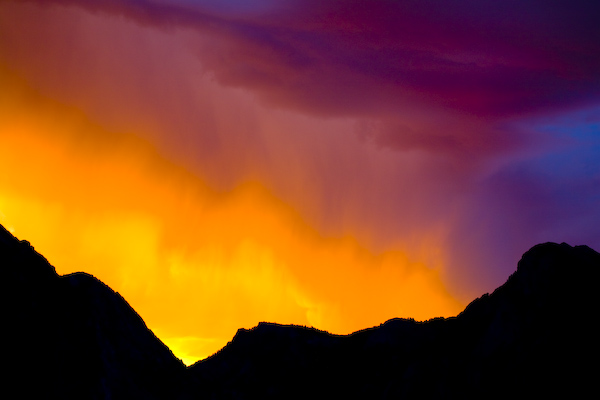
One morning this past week, I was sitting at my desk and happened to look out of the window and saw this — well, almost “this”. Although we get summer thunderstorms here, they most often happen later in the day, after the atmosphere has been heated by the sun; a storm like this around sunrise is rather rare. I quickly grabbed my tripod and camera, slapped on a 100-300 mm zoom, and went downstairs to my back porch. There was no time to find the optimal location; I just set up the tripod on the porch, aimed crudely, and started firing.
After popping off a few shots, I checked the images on the LCD on the back of the camera and saw that the sky was washed out — the camera was seeing a lot of the dark foreground from the mountains and was trying to make those mountains something other than a silhouette. In such high-contrast scenes, the camera is making the best decision it knows how, compromising by overexposing the sky and underexposing the mountains. This is one of those times when the photographer knows better than the camera. I wanted the mountains to go black — it was the color in the sky I was most after. Overexposing the sky was causing low local contrast in the sky. I started dialing in some exposure adjustment: -1/3, -2/3, and -1 stops of exposure. The results began to improve. Within a few minutes, the show was over, and it was time to “develop” the images with Lightroom on the computer.
Despite having dialed in -1 stop of exposure adjustment, I was still seeing a wash-out of the lowest portion of the sky, as well as unwanted detail in foreground (including a tree which, fortunately, was below the ridge line). Using the “Blacks” slider, I shifted the tones lower until the mountains became the silhouette that I had wanted (and the tree disappeared as well). In the process of doing this, I saw considerably more separation of colors in the sky. I then punched up the saturation which further separated the lower sky into yellows and oranges. Then I increased the vibrance which helped bring out some of the purple and blue along the right side.
The camera captured color information beyond what the eye could see in this high-contrast scene. By adjusting the black level and the saturation and vibrance, I was able to bring out the dramatic colors the camera recorded. Shooting in RAW format was a great help here; RAW preserves all of the data that the sensor sees, and programs like Lightroom and Aperture enable you to access all of that data. Had I shot this in JPEG, a lot of the sensor’s data would have been lost, limiting what could be accomplished in post processing. Today’s image reinforces an important lesson: “taking” the picture is but an early step in the overall process of creating a fine photograph. With the digital tools available, we are able to spread out tones and colors otherwise lost in areas of low local contrast.
This image was exposed for 1/40s at f/5.6, using a 100-300 mm f5.6L lens (set to 100 mm) on a Canon EOS 5D.

Tip of the Week
2007.09.03

